
In this lesson we’re going to make your strumming a little bit more musical. In the last lesson we went through the G, D, A minor 7, C progression, keeping the strumming really simple. We did that so you could focus on your chord change. In this lesson we’re going to learn a more musical. This will help you to dig deeper into actually expressing yourself more musically on the guitar. If your chord transitions aren’t quite perfect yet don’t feel like you can’t move on to the ideas in this lesson.
The first thing you we need to cover is how to count sixteenth notes. Up to this point we’ve been counting quarter notes “1 2 3 4”. In order to count sixteenth notes you need to give each beat, or each number, in the “1 2 3 4” four syllables. Count “1 e and ah 2 e and ah 3 e and ah 4 e and ah”. You may feel a little bit silly doing this, but count out loud using that counting system. Do that over and over again until you get used to it.
This new strumming pattern incorporates an upstroke. Don’t feel like you have to strum through all six strings when using your upstrokes. I only hit the top three to five strings when I use my upstrokes. Another tip I want to give you for your upstrokes, and your downstrokes for that matter, is that you don’t have to dig into the strings with a ton of your pick. All you have to use is the very tip. If you dig in with too much of the pick that can make it really hard to get the pick through the strings. Experiment with that. Don’t dig in too much, and don’t feel like you have to hit all six strings with your upstrokes.
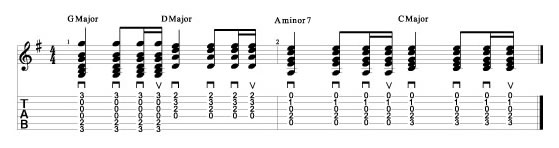
The counting for the new strumming pattern is, “1 2 and ah”. So if you have “1 e and ah” you’re going to have a downstroke on “1” that will last through the entire beat, “1 e and ah”. Next, you have a downstroke on “2” and that’s going to ring out through “2 e”, and then you’re going to have a downstroke on “and” and an upstroke on “ah”. When you get to “3 e and ah 4 e and ah” it’s the same exact thing. Basically what we’re going to be doing is playing that strumming pattern once for each chord in the progression.
To fully understand how this strumming pattern works, we need to talk about something called The Constant Strumming Technique. That is when keeping your arm going for every sixteenth note count even if you are not actually digging in and strumming the strings. So if you have “1 e and ah 2 e and ah” keep your arm going down up down up down up down up the entire time. When you keep your arm going like that constantly all you have to do is dig into the strings on the strumming counts that we talked about. So if we keep this going steady we have “1 e and ah 2 e and ah”. Your arm should just keep going even though the pick is only digging into the strings on the “1 2 and ah”.
When you are first learning this strumming pattern don’t even worry about the chords at first if you don’t want to. If you’re having trouble with it just mute the strings or just stay on one chord. Just get the pattern down. Don’t just lock your wrist and strum from your elbow. That can create some tension. Remember the feather and the honey analogy.
Once you get this down you can apply it to every chord in the chord progression. Here is a trick that will help you with your chord transitions. Make that first G major chord and do the strumming pattern. On the upstroke you can take the G chord off and hit all of the strings open. This will buy you some time to get to the next chord. This is good kind of stepping stone to work on your chord transitions. Don’t be afraid to hit those open strings between those chords. Eventually you’ll want to get to where you can go right to the chords.
So this is a bit more of a musical strumming pattern you can use for this song. Slow this way down if you have to. It doesn’t have to be perfect right away. Remember if you’re having trouble with one particular chord transition, maybe this G to the D, just isolate that. Work on the G to the D.