
In this guitar lesson we are going to go over the remaining chords that you need to know to play the song at the end of this series. These two chords are the open 'G major' chord and the open 'D major' chord. Remember everything we learned in the last lesson about the fretting hand technique. Relax, pretend like you’re holding an apple, keep your thumb behind the fretboard on the back of the neck, come right down on the very tips of your fingers, relax there and right behind the frets too.
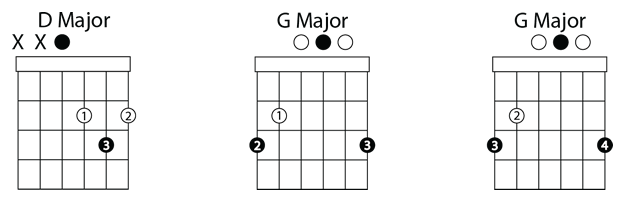
Lets’ get going with the open D major. Look on the chord diagram. You’re going to see “Xs” above the E and the A strings. Those are telling you to leave those notes out of this chord completely. Let’s get uour first finger on the second fret of the G string. Place it right behind the fret. Come right down on the tip of your finger. Your second finger is going to grab the second fret of the high E string, and your third finger is going to grab the third fret of the B string. This chord is a little bit harder just because you have to scrunch your fingers in such a small area. You don’t want the third finger brushing up against this high E string or the G string. Strum just through the top four strings.
Go through the whole process of getting this chord committed to memory. Take it off all the way and put it back on. If it takes you a while to get it there that’s fine. Remember what it looks like. Remember what it feels like too.
Here is another tip for you. If you haven’t had your guitar set up by a professional I would recommend doing it. It’s only twenty or thirty dollars. If your guitar is hard to play it’s totally worth it. It will make your guitar easier to play and your practicing and learning a log more enjoyable.
Let’s move on to the open G major chord. This is probably the most difficult chord of the Beginner Guitar Quick-Start Series. There are going to be two ways that I’m going show you how to play this chord. One way uses the first, second, and third fingers. The second way uses the second, third, and fourth fingers. I recommend using the second, third, and fourth fingers. You’ll see why later, but let’s learn the actual shape first.
Many beginners tend to learn a G using the first, second, and third fingers. Get your second finger on the third fret of the low E string right behind the fret. Your first finger is going to go on the second fret of the A string, and your third finger is going to grab the third fret of the high E string. Strum all six strings.
I would really recommend that you use your second, third and fourth fingers to make your open G chord. Put your third finger on the third fret of the low E string, second finger on the second fret of the A string, and your pinky, your weak pinky, on the third fret of the high E string. This is the exact same exact shape, but we used a different fingering to make the chord. The reason I recommend using your second, third and fourth fingers to make this chord is because a G to a C is a really common chord change for the guitar. If I make the G with my first, second, and third fingers and switch to a C, that’s a huge movement that I have to make. If I make that G with my second, third, and fourth fingers the change isn’t that big. It’s a lot easier to get to that C chord, it’s a lot faster too. So go through that same process for learning your G chord. Put it on and take it off. Remember what it looks like and what it feels like.
Many guitar players struggle with changing chords smoothly. That’s probably one of the biggest challenge for newer guitar players. One of the reasons for that is they don’t learn the chord shapes their working on one hundred percent before they start trying to switch between chords. Learn these chords to where you can go right to them on their own before trying to switch between chords. When you don’t learn a chord really thoroughly what you’re going to do is compound the challenge of switching between chords and that makes it really frustrating for you.
Once you have two chords shapes down, for example a G and a C, what you want to do is try to visualize the chord you are going to switch to before you actually need to go there, so there’s a better chance of hitting it. If I’m playing a G, I want to visualize that C before I actually need to move there. In preparation for the next lesson what you should do is just take two chords at a time. Remember to try and visualize the chord your going to before you actually need to go there.
So try to work on your chord transitions multiple times throughout the day so you can train your muscles and they have a better chance of remembering what’s going on switching between all these chords.